Mind2Tests - Settings
Mind2Tests allows you define several useful options and configure your converters. Here is the list of parameters you can change:
Tools

Select, in each drop list, the tool you want to use for your conversion.
The drop lists contains all the libraries you have installed for Mind2Tests.
To uninstall a library, click the uninstall button at the right of the drop list. You will be asked to confirm your choice.
Configuring the converters
Once you have selected the tools you want to work with, you must configure them to:
-
define some values corresponding to your personnal preferences
-
make their settings match together.
In the screenshot below, you can see that 2 categories of settings are available: priorities and requirement types. They relates to how you identify these attributes in your mind-maps. See the chapter Defining your mind-map.
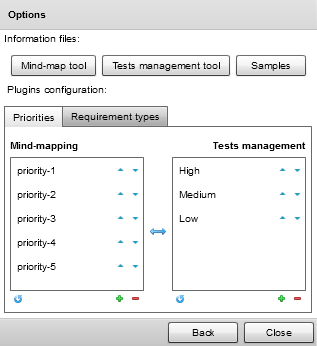
The list at the left is for the name of the icons used in your mind-map. The list at the right is values to be set in the test management tool.
In the section, you can:
-
Edit the default value in the list to enter your own ones,
-
Reorder the items in the list using the up and down arrow at each line,
-
add new values, even blank ones, using the + green button,
-
remove a selected value from the list using the - red button,
-
restore the default settings.
The matching between the parameters is simply done according to the order of the items in their respective list. In the example of the screenshot, which is a default configuration, you have:
-
The test or the requirement marked with the icon named "priority-1" will get the priority "High" in the test management value,
-
The test or the requirement marked with the icon named "priority-2" will get the priority "Medium" in the test management value,
-
The test or the requirement marked with the icon named "priority-4" or below won’t get any priority value.
Do the same in the requirement type tab.
Notes:
-
The icon names to be used in your mind-maps are detailed in the wiki page of each library. Go back to the download table to get the urls.
-
If you don’t use a value, remove it (you will add it later if required) or bypass the matching process by putting a blank value at the right place in the list.
Example:
![]()
In this configuration, there is no icon defined to illustrate the requirement type "Informational‘
-
Be aware that if you change the order or the labels of the properties for the test management tool, this may affect the result of the file import. It actually depends on how the test tool converter works. Refer to its specific help/wiki/readme.
Test Structure

This section is very important and determines how the test cases in your mind-maps are converted.
To play with this option, you must understand how to define your test case in a mind-map.
This option allow you to define the order in which the sub-nodes of your test case node are interpreted. So adapt the order of the test properties in the list to the way you work in your mind-map and the capabilities of the test management tool.
Use the arrows at each line to move the item up or down in the list.
In the example, which illustrates the default settings, the 1st sub-node will be converted to the description property, the 2nd sub-node to a pre-conditions property, the 3rd one will represents all the test steps…
Notes:
-
If, in your mind-map, your test node has only 1 sub-node, it will be considered as the 1st item in the list, ie the test description/summary in the example.
-
If, in your mind-map, a test node is not complete (preconditions not defined), place an empty sub-node at the corresponding position (the 2nd one in our example). This is illustrated in the provided samples.
-
Put the properties that you don’t use/need at the end of the list. For example, TestLink 1.8x don’t make use of pre-conditions which is new in TestLink 1.9x. So move the "preconditions" items at the bottom of the list if you want to import into TestLink 1.8.
Prefixes
You can define a prefix that will be added at the beginning of:
-
Requirement ids (not names)
-
Test suite names
-
Test cases names
This is not mandatory of course, use these options, if you need them for your day-to-day work or for specific projects you are working on.
Examples:
-
If you define "req_" as a prefix for requirements, the requirement having the id 2.3 will get the id "req_2.3" after the conversion..
-
See the chapter How is generated the id of an item to learn more on this point.
-
-
For your project PROJ2011, you decided to prefix all the tests cases with the project code. So set "PROJ2011-" as test cases prefix and the test "Login", as defined in your mind-map, will be converted to "PROJ2011-Login".
Others
Auto save:
When a mind-map is dropped to the Drop Area, the application jumps directly to the Export from to save files.
You can still edit some items by selecting them in the Tree.
Check the option to activate it.
Always on top:
Check the option to keep Mind2Tests always visible, in front of all other windows.
Drop area orientation:
This change the layout of the Drop Area. Define it according to your preference.
![]()
![]()


